Category: ‘iOS’

RxSwiftのシンプルな説明

2018年8月9日 Posted by PURGE

RxSwiftのシンプルな説明

Swiftで簡単なアプリを写経するのは簡単なのであるが、やはり実用的なアプリを作成するには、レスポンシブでないと役な立たない(お客さん受けしない)よねということで、RxSwiftを学んでみた。

正直、3日間くらい、泣きながら、挫けそうになりながら、禿げそうになりながら食らいついていた。

はっきりいって理解するのがキツイ。

■ 開発環境
OS : MacOS High Sierra Version 10.13.6
Xcode : Version 9.4.1

■ サンプリアプリ
ボタンを押すとカウントアップするだけのアプリ。

スクリーンショット 2018-08-09 14.11.12.png

■ ソースコード解説
ViewController.swiftのコードを説明する。

まずは、必要なライブラリをimportする。ここでは、RxSwiftを利用する。

import UIKit
import RxSwift

先に、ラベルとボタンを配置する。
StreatBoardでも良いのであるが、敢えてコードで記述。

class ViewController: UIViewController {

    override func viewDidLoad() {
        super.viewDidLoad()
        // Label
        let countLbl = UILabel()
        countLbl.text = "0"
        countLbl.textAlignment = .center
        countLbl.textColor = UIColor.blue
        countLbl.frame = CGRect(x: (self.view.frame.width-110)/2, y: 150, width: 110, height: 21)

        // Button
        let countUpBtn = UIButton()
        countUpBtn.frame = CGRect(x: (self.view.frame.width-100)/2, y: 200, width: 100, height: 30)
        countUpBtn.layer.borderWidth = 1.0
        countUpBtn.layer.borderColor = UIColor.blue.cgColor
        countUpBtn.layer.cornerRadius = 5.0
        countUpBtn.setTitleColor(UIColor.blue, for: .normal)
        countUpBtn.setTitle("カウントUP", for: .normal)
        countUpBtn.addTarget(self, action: #selector(ViewController.countUp(_:)), for: UIControlEvents.touchUpInside)

        self.view.addSubview(countLbl)
        self.view.addSubview(countUpBtn)
}

次に、RxSwiftの肝であるクラスを作成する。

class RxSwiftSample {

}

RxSwiftSampleクラスには、private宣言されたsubjectPublishSubject<Int>()でインスタンス化して保持しておく。それと、そのsubjectをObservableとして返すeventを定義する。
そして、実際の処理を外部から呼べる myFunc()メソッドを定義する。その中で、onNextとかいうイベントを発行する。

これが基本的な雛形という感じかな?

class RxSwiftSample {
    private let subject = PublishSubject<Int>()

    var event : Observable<Int>{
        return subject
    }
    
    func myFunc(){
        // 処理
        print("myFuncが呼ばれました。")
        // イベント発行
        subject.onNext(self.data)
    }
}

次に、このRxSwiftSampleクラスの使い方なのであるが、ViewControllerから利用できるように、RxSwiftSampleをモデルとしてmodelで宣言しておく。また、後で利用するdisposeBagも宣言しておく。

private let model = RxSwiftSample()
private let disposeBag = DisposeBag()

上記を、ViewControllerから利用する。
先ずは、順を追ってわかりやすく、ボタンに対して、countUp(_ sender: UIButton)が呼ばれるように記述する。これは特に問題はないはず。
重要なのは、ここからmodelmyFunc()を呼び出すことである。

    override func viewDidLoad() {
     //ボタンへイベント登録    
        countUpBtn.addTarget(self, action: #selector(ViewController.countUp(_:)), for: UIControlEvents.touchUpInside)
    }

    @objc func countUp(_ sender: UIButton){
        print("カウントアップ")    
        //Modelの関数呼び出し
        model.myFunc()
    }

ここから、理解が進むと思うが、model.myFunc()で処理を行うと、事前に登録されているsubscribeで通知される。そして、 subject.onNext(self.data)で渡されたパラメータも、value で受け取れる。

        //Reactive処理
        model.event.subscribe(
                onNext: {value in
                    print("ここで通知")                
                    countLbl.text = String(value)
                })
                .disposed(by: disposeBag)

これで、ようやく頭の中で処理シーケンスがつながった。
それでも理解できない場合は、私と同じように1日悩んで、print()仕掛けて、処理を追ってみると良いと思う。

やはり、このようなフレームワークやデザインパターンの理解は正直キツイ。それでも、時間を掛けて手を動かすのが、ベストプラクティスだと思う。

その助けになればと祈る。情報がちょっと時代遅れ感はあるのだが・・・。
始めたのが遅いので仕方ない。w

■ 最後に

ここに記したコードは、自分がRxSwiftの構造を理解するために作成したコードです。間違い等がございましたらご指摘願います。

下記、全ソースコードです。

import UIKit
import RxSwift


private let model = RxSwiftSample()
private let disposeBag = DisposeBag()

class ViewController: UIViewController {

    override func viewDidLoad() {
        super.viewDidLoad()
        // Label
        let countLbl = UILabel()
        countLbl.text = "0"
        countLbl.textAlignment = .center
        countLbl.textColor = UIColor.blue
        countLbl.frame = CGRect(x: (self.view.frame.width-110)/2, y: 150, width: 110, height: 21)

        // Button
        let countUpBtn = UIButton()
        countUpBtn.frame = CGRect(x: (self.view.frame.width-100)/2, y: 200, width: 100, height: 30)
        countUpBtn.layer.borderWidth = 1.0
        countUpBtn.layer.borderColor = UIColor.blue.cgColor
        countUpBtn.layer.cornerRadius = 5.0
        countUpBtn.setTitleColor(UIColor.blue, for: .normal)
        countUpBtn.setTitle("カウントUP", for: .normal)
        countUpBtn.addTarget(self, action: #selector(ViewController.countUp(_:)), for: UIControlEvents.touchUpInside)

        self.view.addSubview(countLbl)
        self.view.addSubview(countUpBtn)

        //Reactive処理
        model.event.subscribe(
                onNext: {value in
                    countLbl.text = String(value)
                })
                .disposed(by: disposeBag)
    }

    @objc func countUp(_ sender: UIButton){
        //Modelの関数呼び出し
        model.myFunc()
    }

    override func didReceiveMemoryWarning() {
        super.didReceiveMemoryWarning()
    }

}

class RxSwiftSample {
    private let subject = PublishSubject<Int>()
    private var data = 0

    var event : Observable<Int>{
        return subject
    }

    func myFunc(){
        // 処理
        data = data + 1

        // イベント発行
        subject.onNext(self.data)
    }
}

Lovly Swift!!!

Alamofire インストール時のcocoapodエラー

2018年8月3日 Posted by PURGE

久しぶりに、swift で iOSの開発。
Podfile に以下を記述した。

source 'https://github.com/CocoaPods/Specs.git'
platform :ios, '11.0'
use_frameworks!

target 'MyProject' do
    pod 'Alamofire', '~> 4.7'
end

cocoaPod で Alamofireインストールしようとしてエラーが発生。

$ pod install
Analyzing dependencies
[!] CocoaPods could not find compatible versions for pod "Alamofire":
  In Podfile:
    Alamofire (~> 4.7)

None of your spec sources contain a spec satisfying the dependency: `Alamofire (~> 4.7)`.

You have either:
 * out-of-date source repos which you can update with `pod repo update` or with `pod install --repo-update`.
 * mistyped the name or version.
 * not added the source repo that hosts the Podspec to your Podfile.

Note: as of CocoaPods 1.0, `pod repo update` does not happen on `pod install` by default.

指示に従い pod repo update を実行して、pod install を再実行。

$ pod repo update
Updating spec repo `master`
Performing a deep fetch of the `master` specs repo to improve future performance

  $ /usr/bin/git -C /Users/xxx/.cocoapods/repos/master fetch origin
  --progress
  remote: Counting objects: 117, done.        
  remote: Compressing objects: 100% (111/111), done.        
  remote: Total 117 (delta 73), reused 0 (delta 0), pack-reused 0        
  Receiving objects: 100% (117/117), 12.89 KiB | 3.22 MiB/s, done.
  Resolving deltas: 100% (73/73), completed with 40 local objects.
  From https://github.com/CocoaPods/Specs
     1a871e6f9db..69b321bd0a4  master     -> origin/master
  $ /usr/bin/git -C /Users/xxx/.cocoapods/repos/master rev-parse
  --abbrev-ref HEAD
  master
  $ /usr/bin/git -C /Users/xxx/.cocoapods/repos/master reset --hard
  origin/master
  Checking out files: 100% (285048/285048), done.
  HEAD is now at 69b321bd0a4 [Add] ADMobGenSMA 0.1.1
warning: inexact rename detection was skipped due to too many files.

再度、インストール。

$ pod install
Analyzing dependencies
Downloading dependencies
Installing Alamofire (4.7.3)
Generating Pods project
Integrating client project

[!] Please close any current Xcode sessions and use `Sample.xcworkspace` for this project from now on.
Sending stats
Pod installation complete! There is 1 dependency from the Podfile and 1 total pod installed.

SwiftでAFNetworkingを利用してJSONデータ取得の覚え書き。

2015年1月24日 Posted by PURGE

結構理論的にはわかっているが、いざソースを書いてみるとかなりハマる。
オプショナル型の制約を熟知していないと、むしろ面倒でバグを誘発するのではないか?

とりあえず、Qiitaに記載する前のドラフト版のソースコード。
エラーが発生しないように、エラーを避けるようなコードを記述しているので結構不安。

MyTableViewController.swift

import UIKit

struct Game {
    init(){}
    var seasonId:String?
    var gameName:String?
    var gameType:String?
    var homeTeamName:String?
    var awayTeamName:String?
    var homeTeamScore: String?
    var awayTeamScore: String?
}

class MyTableViewController: UITableViewController {

    required init(coder aDecoder: NSCoder) {
        self.gameData = Game()
        super.init(coder: aDecoder)
    }

    var gameData:Game
        
    override func viewDidLoad() {
        super.viewDidLoad()

        //リクエストデータ取得
        let manager:AFHTTPRequestOperationManager = AFHTTPRequestOperationManager()
        let serializer:AFJSONRequestSerializer = AFJSONRequestSerializer()
        manager.requestSerializer = serializer
        manager.GET("http://score-sheet.herokuapp.com/api/games/latest.json", parameters: nil,
            success: {(operation: AFHTTPRequestOperation!, responsObject: AnyObject!) in
                let responsDict = responsObject as Dictionary<String, AnyObject>
                
                //値取得
                var seasonId:Int = (responsDict["season_id"] as AnyObject?) as Int
                var gameName:String = (responsDict["game_name"] as AnyObject?) as String
                var gameType:Dictionary = (responsDict["game_type"] as AnyObject?) as Dictionary<String, AnyObject>
                var gameTypeName:String = (gameType["game_type"] as AnyObject?) as String
                var homeTeam:Dictionary = (responsDict["home_team"] as AnyObject?) as Dictionary<String, AnyObject>
                var awayTeam:Dictionary = (responsDict["away_team"] as AnyObject?) as Dictionary<String, AnyObject>
                var homeTeamName:String = (homeTeam["team_name"] as AnyObject?) as String
                var awayTeamName:String = (awayTeam["team_name"] as AnyObject?) as String
                var homeTeamScore = (responsDict["home_team_score"] as AnyObject?) as Int
                var awayTeamScore = (responsDict["away_team_score"] as AnyObject?) as Int
                
                //取得データ設定
                self.gameData.seasonId = String(seasonId)
                self.gameData.gameName = gameName
                self.gameData.gameType = gameTypeName
                self.gameData.homeTeamName = homeTeamName
                self.gameData.awayTeamName = awayTeamName
                self.gameData.homeTeamScore = String(homeTeamScore)
                self.gameData.awayTeamScore = String(awayTeamScore)
                
                //データリロード
                self.tableView.reloadData()

                //テーブルビュー作成
                let tableView = MyTableView(frame: self.view.frame, style: UITableViewStyle.Plain)
                tableView.delegate = self
                tableView.dataSource = self
                self.view.addSubview(tableView)
                
                //セル設定
                let xib = UINib(nibName: "MyTableViewCell", bundle: nil)
                tableView.registerNib(xib, forCellReuseIdentifier: "BfCell")
            },
            failure: {(operation: AFHTTPRequestOperation!, error: NSError!) in
                println("Error!!")
            }
        )
    }

    override func didReceiveMemoryWarning() {
        super.didReceiveMemoryWarning()
        // Dispose of any resources that can be recreated.
    }

    // MARK: - Table view data source

    override func numberOfSectionsInTableView(tableView: UITableView) -> Int {
        // #warning Potentially incomplete method implementation.
        // Return the number of sections.
        return 1
    }

    override func tableView(tableView: UITableView, numberOfRowsInSection section: Int) -> Int {
        // #warning Incomplete method implementation.
        // Return the number of rows in the section.
        return 5
    }
    
    //セルデータ設定
    override func tableView(tableView: UITableView, cellForRowAtIndexPath indexPath: NSIndexPath) -> UITableViewCell {
        let cell = tableView.dequeueReusableCellWithIdentifier("BfCell", forIndexPath: indexPath) as MyTableViewCell
        
        cell.seasonId?.text = self.gameData.seasonId
        cell.gameName?.text = self.gameData.gameName
        cell.gameType?.text = self.gameData.gameType
        cell.homeTeamName?.text = self.gameData.homeTeamName
        cell.awayTeamName?.text = self.gameData.awayTeamName
        cell.homeTeamScore?.text = self.gameData.homeTeamScore
        cell.awayTeamScore?.text = self.gameData.awayTeamScore
        
        return cell
    }

    override func tableView(tableView: UITableView, heightForRowAtIndexPath indexPath: NSIndexPath) -> CGFloat {
        //let cell = tableView.dequeueReusableCellWithIdentifier("BfCell") as UITableViewCell
        //return cell.bounds.height
        return 100
    }
    /*
    // Override to support conditional editing of the table view.
    override func tableView(tableView: UITableView, canEditRowAtIndexPath indexPath: NSIndexPath) -> Bool {
        // Return NO if you do not want the specified item to be editable.
        return true
    }
    */

    /*
    // Override to support editing the table view.
    override func tableView(tableView: UITableView, commitEditingStyle editingStyle: UITableViewCellEditingStyle, forRowAtIndexPath indexPath: NSIndexPath) {
        if editingStyle == .Delete {
            // Delete the row from the data source
            tableView.deleteRowsAtIndexPaths([indexPath], withRowAnimation: .Fade)
        } else if editingStyle == .Insert {
            // Create a new instance of the appropriate class, insert it into the array, and add a new row to the table view
        }    
    }
    */

    /*
    // Override to support rearranging the table view.
    override func tableView(tableView: UITableView, moveRowAtIndexPath fromIndexPath: NSIndexPath, toIndexPath: NSIndexPath) {

    }
    */

    /*
    // Override to support conditional rearranging of the table view.
    override func tableView(tableView: UITableView, canMoveRowAtIndexPath indexPath: NSIndexPath) -> Bool {
        // Return NO if you do not want the item to be re-orderable.
        return true
    }
    */

    /*
    // MARK: - Navigation

    // In a storyboard-based application, you will often want to do a little preparation before navigation
    override func prepareForSegue(segue: UIStoryboardSegue, sender: AnyObject?) {
        // Get the new view controller using [segue destinationViewController].
        // Pass the selected object to the new view controller.
    }
    */
    
}

Unable to run app in Simulator

2014年9月7日 Posted by PURGE

ビルドは上手くいくが、下記のエラーが出力されるときの対応。

Unable to run app in Simulator

An error was encountered while running (Domain = FBSOpenApplicationErrorDomain, Code = 4)

スクリーンショット 2014-09-07 21.15.03

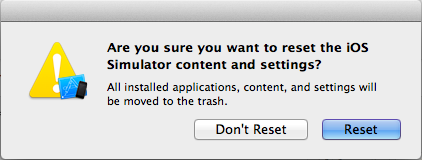
iOSシミュレータの下記メニューからコンテンツをリセットする。

 [iOS Simulator]-[Rest Contents and Settings…]-[Reset]

スクリーンショット 2014-09-07 21.20.56